Emails

Here you can find out how to manage the basic information for your agency.
You can find all the settings explained here in the “Emails” tab of the agency settings.

Du kannst für das guestoo Back-End zwischen zwei Darstellungsoptionen wählen. Die Screenshots in der Doku basieren auf dem "Klassischen Design".
Hier siehst Du die Unterschiede, damit Du dich auch im "Modernen Design" zurecht findest: » guestoo Back-End-Design

Default email texts

Default email texts -

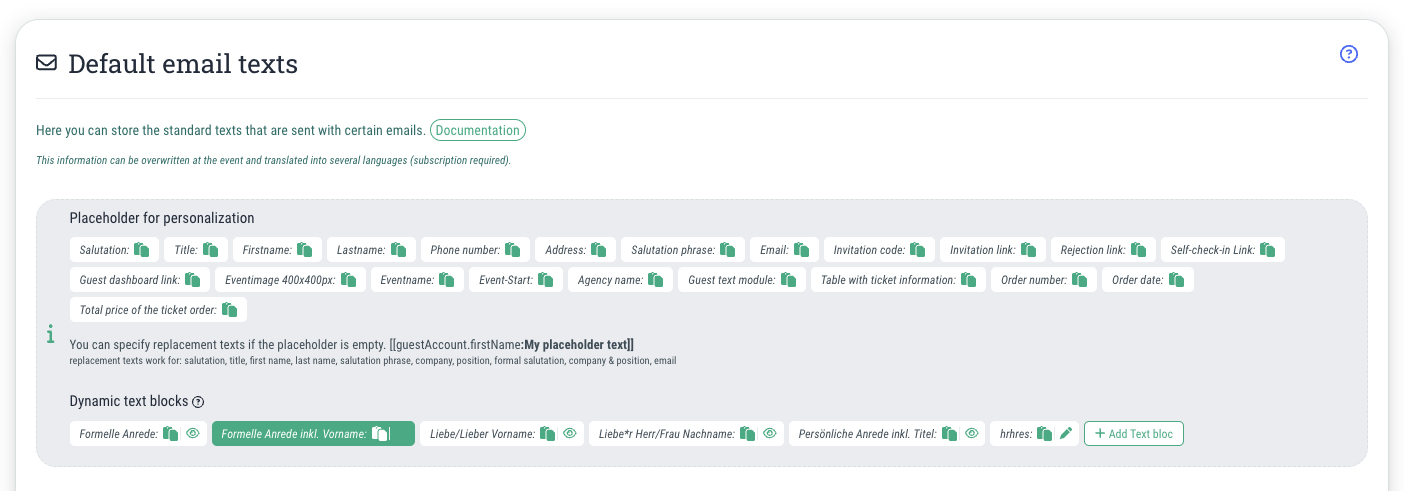
Here you will find a list of all emails that are automatically sent by guestoo to your guests and can customize them accordingly.

Note: guestoo always accesses the information maintained here if you leave it empty at the event itself.

You can edit the following email texts here:

  • Invitation text
    Your guests will receive this email when you manually invite them to an event/test.
  • Double opt-in email
    Your guests will receive this email after registering for the event to confirm the accuracy of their data. If you have deactivated the DOI procedure in your workflow, you can ignore this template, but we recommend that you use the DOI procedure for legal reasons.
  • Confirmation email » Registered, but not yet confirmed
    This text is in the confirmation email if the option is activated that you have to manually confirm each guest before their participation is confirmed.
  • Confirmation email » Registered, order approval pending
    This email is sent if the guest has to wait for the order to be approved after registration.
  • Confirmation email » Registered, waiting list
    This email will be sent when the guest has been placed on the waiting list.
  • Confirmation email to the guest
    Your guests will receive this email to confirm their participation after they have confirmed the accuracy of their data by clicking on the link in the DOI email.
  • Automatic reminder email to the guest
    This email will be sent to the guest 3 days before the event if the automatic reminder is activated. How you can (de)activate it is explained on this page.
  • Cancellation to a guest
    A guest will receive this email if you, as the organizer, manually cancel their participation in the event.
  • Confirmation email in case of cancellation by a guest
    Your guests will receive this email as confirmation if they have canceled their participation in the event via the “Cancel” button in the confirmation email. This email template is only relevant if you allow your guests to cancel their participation.
  • Email with check-in link
    In this email, your guests will receive the link to check-in so that they can check in independently at the event.
  • Email with check-out link
    In this email, your guests will be sent the link to check out so that they can check out independently at the event.
  • Default text agency user
    This email is sent to the people you invite as users to your agency. No personalization is possible with this email template!

Tip: You can use the placeholders shown above to personalize the emails to your guests, e.g. by inserting their name. To use one of the available placeholders, click on the corresponding placeholder to copy it to your clipboard and then paste it in the desired position in the text.

Email sender settings

Email sender settings -

By default, guestoo uses the following sender data for outgoing emails:

  • Sender name: guestoo
  • Sender: einladung@guestoo.de
  • Displayed as: guestoo <einladung@guestoo.de> (View may vary depending on the email program)

Depending on which subscription you use guestoo with, you have various options for changing the sender that is displayed to your guests in all emails sent via guestoo:


Free subscription

  • You can influence neither the sender name nor the sender address


Basic subscription and higher

  • You can change the sender name in the agency settings
  • Example: If you enter “Max Mustermann” as the sender's name, the recipient will see the following:
    Max Mustermann <einladung@guestoo.de> 


Pro subscription and higher

  • You have the option of changing both the sender name and the sender address (limited)
  • Example: If you enter “Max Mustermann” as the sender name and “max” as the sender, the recipient will see the following:
    Max Mustermann <max@guestoo.de>
Completely own sender address (from Pro subscription)

If you prefer to use your own email address as the sender instead of one of the domains provided by us, that is also possible.

You can find more information about the setup and any costs involved on this page.

Set up SMS gateway

Paid additional feature

Set up SMS gateway - Paid additional feature

With guestoo you have the option of sending SMS messages to your guests in addition to emails, e.g. in the form of info mailings or double opt-in SMS messages.

You can find more information about the additional feature, which is available at an extra charge, here.


As soon as the feature has been activated, proceed as follows to configure the settings required for sending SMS via guestoo:


On SMS77

  • Create an account on SMS77 by following this link
  • Log in on SMS77
  • Go to the menu item "Developer"
  • Click on the pen symbol
  • Enter the following under “Label”: guestoo
    (Has no further relevance, but must be filled in!)
  • Click on "Save"
  • Copy the displayed key


On guestoo

  • Go to the menu item "Agency"
  • In the “Info” tab, scroll down to the “Set up SMS gateway” section
  • Click on "Edit"
  • Paste the key you copied from SMS77 under “SMS-API-Key”
  • Click on "Save"

Done - the necessary settings for sending SMS have now been made!

Important notes on sending SMS via guestoo
  • Sending SMS via guestoo is only possible if you have credit on SMS77!
  • Therefore, always keep an eye on the credit balance on SMS77 - you can also view your credit balance at any time on guestoo under “Agency > Info > Set up SMS Gateway”